Vue 3 Async Components and Bundle Splitting
This article is available as a screencast!
Today we will explore the new Asynchronous Component API for Vue.js 3, and some practical use cases.
It is defined in the Asynchronous Component API RFC.
Two ways to define async components
There are two ways you may define an asynchronous component. This is pretty typical of many APIs in Vue - you have a “simple” way, which just lets you get on with solving your problem, and a more robust way, to give you full control. This is one of the reasons I like Vue so much - it caters to both situations.
Let’s start with the most simple async component, and a basic example. We will be using render functions in .ts files instead of .vue files in this article. The reason is we will be using webpack 5 beta, which does not appear to work with vue-loader out of the box (vue-loader targets webpack 4). The concepts and ideas are the same.
import { defineComponent, h, createApp } from 'vue'
import Hello from './Hello'

export const App = defineComponent({
  name: 'App',

  components: {
    Hello
  },

  render() {
    return h('div', ['This is app', h(Hello)])
  }
})

window.addEventListener('DOMContentLoaded', () => {
  const el = document.createElement('div')
  el.id = 'app'
  document.body.appendChild(el)

  createApp(App).mount('#app')
})
In this example, we just render the world “Hello” using a <Hello /> component. Not exciting. We can create an asynchronous component from any regular component though, like this:
import { defineComponent, h, createApp, defineAsyncComponent } from 'vue'

const AsyncHello = defineAsyncComponent(() => import('./Hello'))

export const App = defineComponent({
  name: 'App',

  components: {
    AsyncHello
  },

  render() {
    return h('div', ['This is app', h(AsyncHello)])
  }
})
Vue 3 gives us a defineAsyncComponent function, which lets us import the component by passing a callback. This looks like nothing, but it opens a lot of possibilities. In the first example, when we build our project, we get one large bundle.js file that has all the component code in the build. In a very large app, this could be a very big file, which may lead to poor performance on the initial page load.
By defining the component using defineAsyncComponent, and passing a callback, we can defer loading the Hello.vue component until the component is actually loaded. This main place this is useful is loading routes asynchronously - for example, you might only load the /shopping_cart route when (if) the user accesses that page.
This alone is not enough to actually load the component independantly - you need to configure your build tool to create it in a separate file (this will most often be with Webpack). Most tutorials will stop here and say “that’s outside the scope of this lecture/article!” which is not exactly useful. This is not one of those articles. Install these dependencies:
{
  "dependencies": {
    "vue": "^3.0.0-beta.7",
  },
  "devDependencies": {
    "ts-loader": "^7.0.2",
    "typescript": "^3.8.3",
    "webpack-cli": "^3.3.11",
    "webpack": "^5.0.0-beta.15"
  }
}
And a simple webpack config:
const path = require('path')

module.exports = {
  mode: "development",
  entry: {
    index: './App.ts'
  },
  output: {
    path: path.resolve(__dirname, './dist'),
    publicPath: '/dist/'
  },
  module: {
    rules: [
      {
        test: /\.ts$/,
        loader: 'ts-loader',
      }
    ]
  },
  resolve: {
    extensions: [".ts", ".tsx", ".js"]
  },
}
And tsconfig.json:
{
  "compilerOptions": {
    "target": "ES6",
    "module": "ESNext",
    "moduleResolution": "node",
    "lib": ["es2017", "dom"]
  }
}
We will use webpack soon. First we will look at the a more robust way to define an async component.
The “options” API
I call this the “options” API, since you supply lots of options. First, we will build the above example using the options API:
<script lang="ts">
import { h, defineComponent, defineAsyncComponent, ComponentOptions } from 'vue'
import Hello from './Hello.vue'

const Loader = defineComponent({
  render() {
    return h('progress')
  }
})

const AsyncHello = defineAsyncComponent({
  loader: () => {
    return new Promise<any>(res => {
      setTimeout(() => {
        res(Hello)
      }, 5000)
    })
  },

  loadingComponent: Loader,
  delay: 0
})

export default defineComponent({
  name: 'App',

  components: {
    AsyncHello
  }
})
</script>
When using the options API, you will pass an object to defineAsyncComponent. I am using loader, loadingComponent and delay.
loaderis a function that must return a component. When they call itloader, they mean “the function that will load the component”. In this case, we delay it for 2000ms.loadingComponent. This is like<template #fallback>in the newSuspenseAPI, which you can read about in my Introduction to Suspense article. This will be displayed untilloaderreturns.delay. This is the duration until theloadingComponentis shown. I always set this to0- I want to show the loading component straight away, while we wait forloaderto resolve. If it was1000, we should show nothing for 1000ms, then the loading component until 5000ms, then the Hello component.
When loading fails
There is another option: errorComponent. This will be rendered when an error occurs in loader. For example:
const ErrorComponent = defineComponent({
  render() {
    return h('div', 'Error')
  }
})

const AsyncHello = defineAsyncComponent({
  loader: () => {
    return new Promise<any>((res, rej) => {
      setTimeout(() => {
        rej()
      }, 2000)
    })
  },

  loadingComponent: Loader,
  errorComponent: ErrorComponent,
  delay: 0
})
This will render Error after 2000ms. Not all hope is lost! There is an onError callback. We can use it like this:
let loadAttempts = 0
const AsyncHello = defineAsyncComponent({
  loader: () => {
    return new Promise<any>((res, rej) => {
      setTimeout(() => {
        if (loadAttempts < 3) {
          loadAttempts += 1
          rej()
        } else {
          res(Hello)
        }
      }, 1000)
    })
  },

  loadingComponent: Loader,
  errorComponent: ErrorComponent,
  delay: 0,
  onError(error, retry, fail, attempts) {
    retry()
  }
})
In this example, we keep retrying with retry until loadAttempts is greater than 3, then we successfully load the component. This wouldn’t be ideal in a production system - after a few fails attempts, you likely just want to show a error message and prompt the user to try again - your service is probably down if the component has failed to load multiple times. You can also track the amount of failures using the attempts argument, the fourth argument to onError.
Actually loading the component asynchronously
Now we know about the different ways to make asynchronous components, time to see it in action. Create Hello.ts and Greet.ts like so:
// Hello.ts
import { defineComponent, h, ref, defineAsyncComponent } from "vue";


export default defineComponent({
  data() {
    return {
      show: false
    }
  },

  render() {
    if (this.show) {
      const Greet = defineAsyncComponent(() => import('./Greet'))
      return h(Greet)
    } else {
      return h('button', { onClick: () => this.show = true }, 'Show Greeting')
    }
  }
})
// Greet.ts
import { defineComponent, h } from "vue";
export default defineComponent({
render() {
return h('div', 'Greet Component')
}
})Greet is conditionally rendered when you click “Show Greeting”. This means we do not want to load the component until it is actually needed.
App.ts is like this:
import { defineComponent, h, createApp, defineAsyncComponent } from 'vue'

const AsyncHello = defineAsyncComponent(() => import('./Hello'))

export const App = defineComponent({
  name: 'App',

  components: {
    AsyncHello
  },

  render() {
    return h('div', ['This is app', h(AsyncHello)])
  }
})

window.addEventListener('DOMContentLoaded', () => {
  const el = document.createElement('div')
  el.id = 'app'
  document.body.appendChild(el)

  createApp(App).mount('#app')
})
Hello is also asynchronous - this is kind of pointless, since we need it immeidately, but it helps drive home the bundle splitting we are about to do.
Run yarn webpack --mode="development". You will see dist has three files:
$ ls dist
Greet_ts.js Hello_ts.js index.js

      Asset      Size
Greet_ts.js  1.78 KiB  [emitted]
Hello_ts.js  2.38 KiB  [emitted]
   index.js   359 KiB  [emitted]  [name: index]
index.js is big. It contains all of Vue - that’s why. Greet_ts and Hello_ts are small - they are tiny little components. Webpack is smart enough to not bundle Vue with them, since it is already in index.js.
Here is my index.html:
<!DOCTYPE html>
<html lang="en">
<head>
  <meta charset="UTF-8">
  <title></title>
  <script src="./dist/index.js"></script>
</head>
<body>

</body>
</html>
I ran a simple server with python3 -m http.server. Visting localhost:8000, I get:
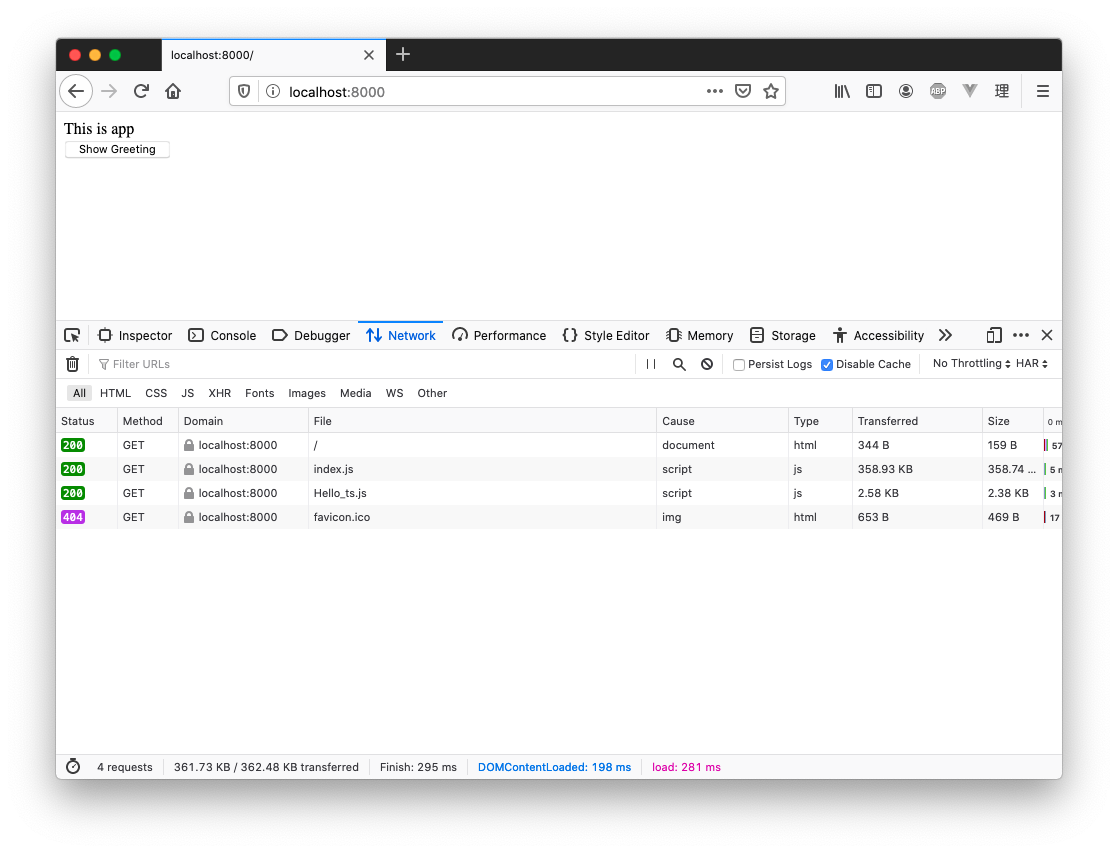
Note the Network tab - we loaded Hello_ts individually. Cool. Now click “Show Greeting”:
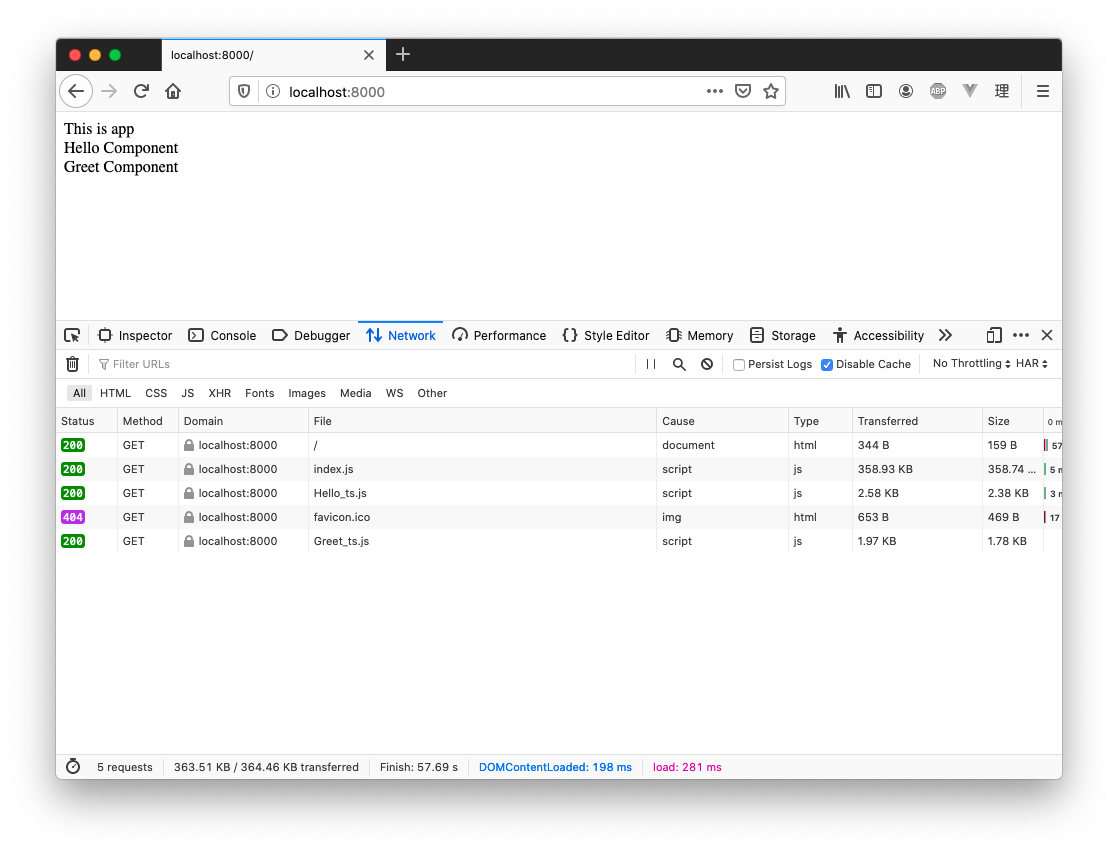
It only loaded the Greet component when it was needed! You can play around with the most robust “options” API to see what else it can do.
How about testing?
Testing will be easy or hard, depending on your setup. I’ve had good experience so far, with minimal problems. I have added some simple tests using async components to the latest version of Vue Test Utils - see them here. An example is like this:
it('works with options usage', async (done) => {
  const Async = defineAsyncComponent({
    loader: () =>
      new Promise<any>((res) => {
        setTimeout(() => {
          res({
            template: '<div>Async Component</div>'
          })
        }, 75)
      }),
    loadingComponent: {
      template: '<div>Loading Component</div>'
    },
    delay: 10
  })

  const Comp = defineComponent({
    render() {
      return h('div', [h(Async)])
    }
  })

  const wrapper = mount(Comp)

  setTimeout(() => {
    expect(wrapper.html()).toContain('Loading Component')
  }, 35)

  setTimeout(() => {
    expect(wrapper.html()).toContain('Async Component')
    done()
  }, 100)
})
As you can see, we use setTimeout to ensure our expectations are running at the correct time. Even if you use webpack as your build tool and Jest as your test tool, things should still work the same, since Jest will just read and import files as needed, regardless of how you are bundling them with webpack.
Conclusion
Asynchronous components can be used to split your bundle and load components just before they are needed. You can easily transform an existing component to be asynchronous using defineAsyncComponent and returning an import, or use the options API to have more control. Loading components asychronously can improve performance, but it comes with added complexity. As always, weight up the pros and cons, and go for the most simple solution that satisfies your needs.
Absolutely no unsolicted spam. Unsubscribe anytime.