A Vue + Vite Powered Spreadsheet interface
This article is available as a screencast!
In the previous blog post, we built a simple spreadsheet engine. It doesn’t support all the features we’d like to support yet, like formulas, but now is good time to see how our design holds up when we try building a UI. This will help us catch any poor design decisions before it’s too late.
I am using Vite and Vue.js 3, so I added them with yarn add vue@next vite.
At the end of this post, we will render something like this:
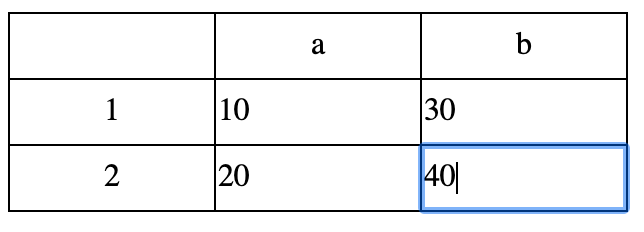
I think looks pretty good. Simple is best!
You can find the completed source code here.
Creating the Components
I normally don’t like to make components until I actually know I will need them, but in this case I have put some thought into my design and have settled on using at least four components: app.vue, spreadsheet-header.vue, spreadsheet-body.vue and spreadsheet-editable-cell.vue. We also need index.html and index.js to get started. I created all those and added some minimal content to get started:
index.html looks like this:
<!DOCTYPE html>
<html lang="en">
<head>
  <meta charset="UTF-8">
  <meta name="viewport" content="width=device-width, initial-scale=1.0">
  <title>Spreadsheet</title>
</head>
<body>
  <div id="app"></div>
  <script type="module" src="index.js"></script>
</body>
</html>
index.js
import { createApp } from 'vue'
import App from './app.vue'

createApp(App).mount('#app')
Finally, here is a basic app.vue with all the styling we will be using. To keep things simple I am not scoping the <style>.
<template>
  ok
</template>

<script lang="ts">
export default {
}
</script>

<style>
table {
  border-collapse: collapse;
}
td {
  border: 1px solid;
  width: 100px;
  height: 100%;
}
tr {
  height: 40px;
}
input {
  padding: 0px;
  margin: 0px;
  border: none;
  width: 100%;
  height: 100%;
  font-family: initial;
  font-size: initial;
}
td > span {
  display: flex;
  align-items: center;
  height: 100%;
}
td:first-child {
  text-align: center;
}
</style>
Now we are rendering ok if you run yarn vite and visit localhost:3000. Time to start building the UI.
Rendering the Spreadsheet
Let’s try out the render function from the previous post. Update app.vue:
<template>
  <pre>
{{ sheet }}
  </pre>
</template>

<script lang="ts">
import { reactive, computed } from 'vue'
import { render, Sheet } from './spreadsheet'

export default {
  setup() {
    const sheet = reactive<Sheet>({
      cells: {
        'a1': {
          value: '1',
          type: 'primitive',
        },
        'a2': {
          value: '2',
          type: 'primitive',
        },
        'b1': {
          value: '3',
          type: 'primitive',
        },
        'b2': {
          value: '4',
          type: 'primitive',
        }
      }
    })

    return {
      sheet: computed(() => render(sheet))
    }
  }
}
</script>
It renders like this:
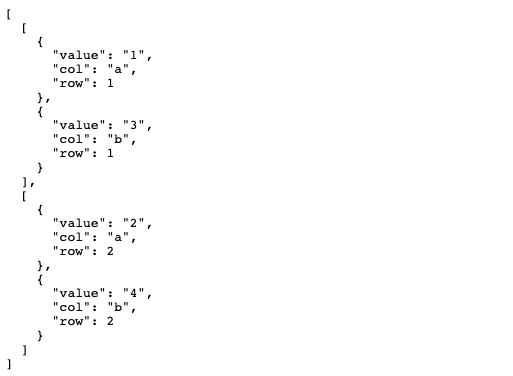
This is useful for debugging.
Creating the Spreadsheet Header
Let’s move on to rendering the header - so the column labels, (a, b, c…). Update spreadsheet-header.vue:
<template>
  <tr>
    <td></td>
    <td v-for="i in colCount">
      {{ toAlpha(i) }}
    </td>
  </tr>
</template>

<script lang="ts">
export default {
  props: {
    colCount: {
      type: Number
    }
  },
  methods: {
    toAlpha(i: number) {
      return String.fromCharCode(i + 96)
    }
  }
}
</script>
I have decided to pass a single prop to <spreadsheet-header> - the colCount, or number of columns. We also render one empty <td> - this is the top right cell, which is empty (see the screenshot at the start of this article to see what I mean).
If ther is 5 columns, we will loop from 1…5. We change 1…5 to a…e using String.fromCharCode, as we learned in the previous blog post. We add 96 because the ASCII codes for a…z start at 97.
Try using the new <spreadsheet-header> component in <app>:
<template>
  <spreadsheet-header :colCount="sheet[0].length" />
  <pre>
{{ sheet }}
  </pre>
</template>
It works:
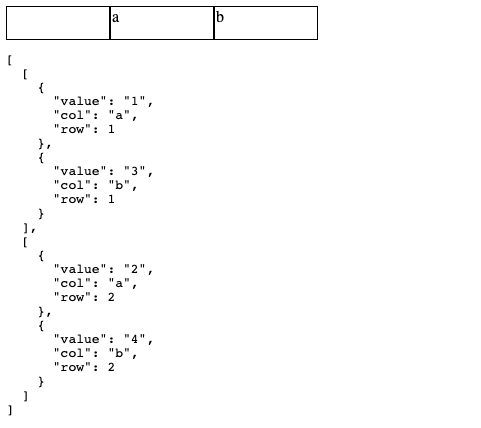
We can figure out how many colums there are by grabbing the length of the first row - or any row, really, they all have th same amount of columns. This was a desgn decision we made when we implemented the render and calcMaxDimensions function.
Creating the Spreadsheet Body
Now comes the fun part - implementing the body of the spreadsheet. Let’s start simple - just render the cells:
<template>
  <tr v-for="row in rows">
    <td>{{ row[0].row }}</td>
    <td
      v-for="cell in row"
    >
      {{ cell.value }}
    </td>
  </tr>
</template>

<script lang="ts">
import { UICell } from './spreadsheet'
export default {
  props: {
    rows: {
      type: Array as () => UICell[][]
    }
  }
}
</script>
The UICell type has a row value, which we use to render a static <td>. Then we loop over each cell and render the value. It looks like this:
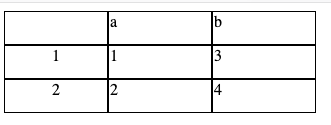
Good progress! The next part is a little more interesting.
Spreadsheets are Modal Editors
It turns out Vim is not the most popular modal editor out there… Excel is. You are in visual mode by default - everything is read only. When you click a cell, you enter insert mode for that cell. Then when you finish typing and navigate away from the cell, or press enter, the spreadsheet re-renders (if any formulas are impacted by your changes). In this case, the sheet.cells reactive value is only updated when we finish editing a cell.
The way I have decided to handle this is render a <td> with the value initially, then when you click a cell, replace it with an <input> with the value bound to the cell’s value. So something like this:
<td v-if="editing">
  <input :value="cell.value" /> <!-- editable -->
</td>

<td v-if="!editing">
  {{ cell.value }} <!-- static -->
</td>
We also need to keep track of which cell is currently in “insert” mode - it will only ever be one. Keeping track of insert mode is a UI concern - we don’t want to store this in the spreadsheet data model. The spreadsheet itself does not need to know about what is currently getting edited - it only cares about the state of the data in each cell, and this is only going to be updated when you have finished editing a cell and press enter. When this occurs, we will update the sheet.cells reactive value, and recalculate and formulas (formulas will be implemented in the next post).
Since the cells are a going to become quite complex, we will make a new component. Update spreadsheet-editable-cell.vue. There is quite a bit going on here - see after the snippet for an explanation:
<template>
  <td v-show="active">
    <input
      ref="cellRef"
      :value="cell.value"
    />
  </td>
  <td
    v-show="!active"
    @click="activate"
  >
    <span>
      {{ cell.value }}
    </span>
  </td>
</template>

<script lang="ts">
import { computed, ref, onMounted } from 'vue'
import { Sheet, UICell } from './spreadsheet'
export default {
  props: {
    cell: {
      type: Object as () => UICell
    },
    activeCell: {
      type: String
    }
  },
  setup(props, { emit }) {
    const cellRef = ref(null)
    const active = computed(() =>
      props.activeCell === `${props.cell.row}${props.cell.col}`
    )
    const activate = () => {
      emit('activate',  { cell: props.cell, cellRef })
    }
    return {
      active,
      activate,
      cellRef
    }
  }
}
</script>
The <template> tag is basically the pseudocode explained earlier - we use v-show to conditionally show/hide an <input>. activeCell is a prop which we will implement in the <spreadsheet-body> soon - this is the cell index, eg a1, b2 etc. If the activeCell matches the current spreadsheet-editable-cell.vue component, we show the <input>. We also include a cellRef - this is so we can automatically focus the current cell with cellRef.focus(). Finally, we emit an activate event when clicking a cell in visual (aka, not insert) mode.
Finally, update <spreadsheet-body> to use the new component:
<template>
  <tr v-for="row in rows">
    <td>{{ row[0].row }}</td>
    <spreadsheet-editable-cell
      v-for="cell in row"
      :cell="cell"
      :activeCell="activeCell"
      @activate="activate"
    />
  </tr>
</template>

<script lang="ts">
import { ref, Ref, nextTick } from 'vue'
import SpreadsheetEditableCell from './spreadsheet-editable-cell.vue'
import { UICell } from './spreadsheet'

interface Activate {
  cell: UICell
  cellRef: Ref<HTMLInputElement>
}

export default {
  components: {
    SpreadsheetEditableCell
  },

  props: {
    rows: {
      type: Array as () => UICell[][]
    }
  },

  setup() {
    const activeCell = ref('')
    const activate = ({ cell, cellRef } : Activate) => {
      activeCell.value = `${cell.row}${cell.col}`
      nextTick(() => cellRef.value.focus())
    }
    return {
      activeCell,
      activate
    }
  }
}
</script>
Notice we are using nextTick(() => cellRef.value.focus())? This is because you cannot do focus() on an element with display: none, which is what v-show does. We need to wait for the nextTick, when display: none is removed from the <input>.
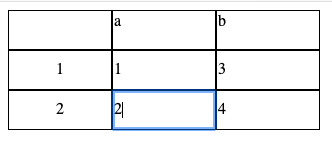
It works! And looks pretty slick. The natural blue outline from the <input> makes it very clear which cell is currently selected.
The next step will be actually updating the sheet.cells value when we finish editing. We will see how to do this in the blog post, as well as work on formulas.
Absolutely no unsolicted spam. Unsubscribe anytime.